
TL;DR
Deploying Next.js to Vercel with environment variables is straightforward: create .env.local files for local development, prefix client-side variables with NEXT_PUBLIC_, then add your variables in Vercel’s dashboard under Project Settings → Environment Variables. Vercel automatically loads these during deployment. You can set different values for Production, Preview, and Development environments. Never commit .env.local to Git. For sensitive data like API keys, use server-side variables (without the NEXT_PUBLIC_ prefix). Vercel also provides system variables like VERCEL_ENV and VERCEL_URL that you can use without configuration. Deploy via the dashboard, CLI, or automatic Git integration—environment variables work the same way across all methods.
Tested On
This guide has been tested and verified with:
- Next.js: 14.2.x and 15.x (App Router)
- Node.js: v18.17+, v20.x, v22.x
- Vercel CLI: v33.x
- Vercel Platform: February 2026
- Package Managers: npm 10.x, yarn 1.22.x, pnpm 8.x
The steps work with both Pages Router and App Router, though examples use App Router syntax.
What You’ll Learn
This guide walks you through everything you need to deploy a Next.js application to Vercel with properly configured environment variables. You’ll learn how to set up variables locally, configure them in Vercel, understand the differences between public and private variables, and follow best practices for secure, production-ready deployments.
Prerequisites
Before starting, ensure you have:
- Node.js (v18 or later) and npm/yarn installed
- Basic familiarity with Next.js
- A Vercel account (free tier works fine)
- A Git repository with your Next.js project
Understanding Environment Variables in Next.js
What Are Environment Variables?
Environment variables are key-value pairs that store configuration data outside your codebase. Instead of hardcoding an API key directly in your code like const API_KEY = "abc123", you store it as an environment variable and reference it as process.env.API_KEY.
This approach keeps sensitive data secure and allows you to use different configurations for development, staging, and production without changing your code.
Why Environment Variables Matter for Deployment
When deploying to production, environment variables become critical for several reasons:
- Security: API keys, database credentials, and authentication secrets must never be committed to version control. Environment variables keep these secure.
- Flexibility: You can use different database connections, API endpoints, or feature flags for development versus production without modifying code.
- Team collaboration: Team members can have their own local configurations without conflicts.
Public vs. Private Environment Variables
Next.js handles environment variables in two distinct ways:
- Private variables (server-side only) are accessed in server components, API routes, and during build time. These are never exposed to the browser. Example:
DATABASE_URL. - Public variables (client-side accessible) must be prefixed with
NEXT_PUBLIC_and are embedded into the JavaScript bundle sent to browsers. Example:NEXT_PUBLIC_API_ENDPOINT.
Warning: This distinction is crucial for security. Never prefix sensitive data with
NEXT_PUBLIC_or it will be visible in your client-side code.
Setting Up Environment Variables Locally
Creating Your .env Files
Next.js supports multiple .env files with a specific loading priority:
| File | Description |
|---|---|
.env.local | Loaded in all environments, ignored by Git |
.env.development | Loaded in development mode |
.env.production | Loaded in production mode |
.env | Loaded in all environments (base config) |
Create a .env.local file in your project root:
| |
Important: Add .env.local to your .gitignore file immediately:
| |
Loading Environment Variables in Next.js
Next.js automatically loads environment variables from .env files. Access them in your code:
| |
Testing Locally Before Deployment
Run your development server to test:
| |
If variables aren’t loading, check:
- File is named
.env.local(not.env.txt) - No spaces around the
=sign - Restart your dev server after adding new variables
Deploying Next.js to Vercel: Step-by-Step Guide
Method 1: Deploy via Vercel Dashboard
This is the most common and straightforward approach.
- Step 1: Push your Next.js project to GitHub, GitLab, or Bitbucket.
- Step 2: Go to vercel.com and click “Add New” → “Project”.
- Step 3: Import your Git repository and click “Deploy” (you can add environment variables later).
- Step 4: After the initial deployment, go to your project’s Settings → Environment Variables.
- Step 5: Add your variables: - Name:
DATABASE_URL- Value:postgresql://production-host:5432/proddb- Environment: Production
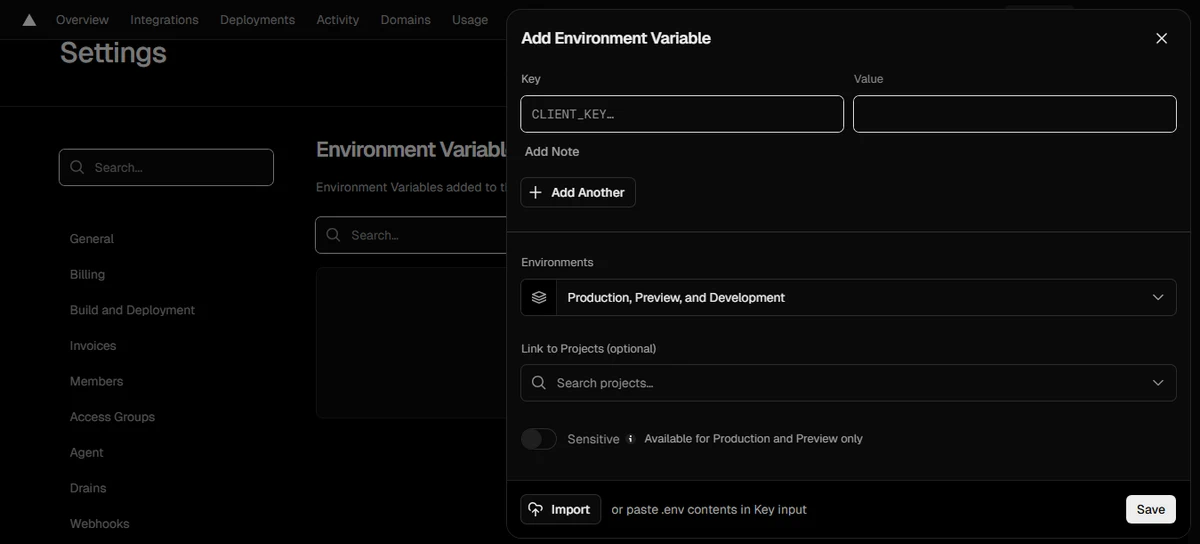
- Step 6: Choose which environments should have access:
- Production: Your main deployment (your-site.vercel.app)
- Preview: Git branch deployments and pull requests
- Development: When running
vercel devlocally
- Step 7: Redeploy your project. Go to Deployments → click the three dots on the latest deployment → “Redeploy”.
Your environment variables are now active.
Method 2: Deploy via Vercel CLI
For developers who prefer command-line workflows:
Install Vercel CLI:
| |
Login and link your project:
| |
Add environment variables via CLI:
| |
Pull variables to local development:
| |
Deploy:
| |
Method 3: Using vercel.json Configuration
For infrastructure-as-code approaches, you can define some settings in vercel.json, though environment variables themselves should still be set via the dashboard or CLI for security:
| |
Note: This method is less common for sensitive variables and is better suited for non-sensitive configuration.
Vercel-Specific Environment Variables
System Environment Variables Vercel Provides
Vercel automatically exposes several system variables you can use without configuration:
VERCEL_ENV: Indicates the environment (production,preview, ordevelopment).VERCEL_URL: The deployment URL (e.g.,my-app-abc123.vercel.app). Useful for generating absolute URLs.VERCEL_GIT_COMMIT_SHA: The Git commit hash for the current deployment.VERCEL_GIT_COMMIT_REF: The Git branch name.
Using System Variables in Your Application
Example of environment-specific configuration:
| |
Advanced Environment Variable Configuration
Environment Variables for Different Deployment Environments
Vercel allows you to set different values for the same variable across environments. This is powerful for testing:
- Production:
API_URL=https://api.production.com - Preview:
API_URL=https://api.staging.com - Development:
API_URL=http://localhost:4000
When you push a branch or open a pull request, Vercel creates a preview deployment that automatically uses the Preview environment variables.
Sensitive Data and Encrypted Variables
Vercel encrypts all environment variables at rest. They’re only decrypted during build time and runtime, never stored in plain text.
Dynamic and Runtime Environment Variables
Important limitation: Next.js environment variables are embedded at build time, not runtime. This means you can’t change them after deployment without rebuilding.
If you need runtime configuration, use these workarounds:
- Option 1: Use an API route to fetch configuration dynamically.
- Option 2: Use Vercel Edge Config for dynamic values that can change without redeploy.
Building a Real-World Example
Let’s build a simple Next.js app that uses environment variables for a third-party API.
Sample Application Setup
Create a new Next.js app:
| |
Create .env.local:
| |
Configuring Environment Variables
Create an API route that uses the private variable:
| |
Use the public variable in your component:
| |
Troubleshooting Common Issues
Environment Variables Not Loading
- Problem: Variables work locally but not in production.
- Solutions:
- Verify you added variables in Vercel dashboard for the correct environment.
- Check variable names match exactly (case-sensitive).
- Redeploy after adding new variables.
- For client-side variables, ensure
NEXT_PUBLIC_prefix.
Different Behavior Between Local and Production
- Problem: App works locally but breaks in production.
- Debugging steps:
- Check Vercel deployment logs: Go to Deployments → View Function Logs.
- Verify environment variable values in Settings.
- Test with
vercel devlocally (uses Vercel’s environment).
Best Practices for Vercel Deployment
Security Best Practices
- Never commit secrets: Always add
.env.localto.gitignore. - Minimize public variables: Only use
NEXT_PUBLIC_when the browser absolutely needs the value. - Rotate regularly: Change API keys and secrets periodically.
- Use different keys per environment: Don’t reuse production keys in development.
Organization and Management
- Naming conventions: Use uppercase with underscores:
DATABASE_URL,STRIPE_SECRET_KEY. - Document your variables: Keep a
.env.examplefile in your repo with dummy values:
| |
Validation with Zod
For type safety and validation, use a library like Zod:
| |
Frequently Asked Questions (FAQ)
Do I need to redeploy after changing environment variables in Vercel?
Yes. Environment variables are injected at build time, so you must redeploy for changes to take effect.
Can I use environment variables in client components?
Only if they’re prefixed with NEXT_PUBLIC_. Regular variables will be undefined in the browser.
Why are my environment variables showing as undefined?
Check for missing prefixes, case-sensitivity typos, or ensure the server was restarted after local changes.
How many environment variables can I have in Vercel?
Vercel has a 4KB limit per variable value and allows up to 100 variables per project on the free tier.
Conclusion
Deploying Next.js to Vercel with environment variables is a core skill for modern web development. By using .env.local for local development, prefixing client-side variables correctly, and leveraging Vercel’s dashboard for production secrets, you ensure your application is both secure and flexible.
Additional Resources
- Next.js Environment Variables Documentation
- Vercel Environment Variables Guide
- T3 Env - Type-safe environment variable validation